Chimney caps are an important part of your chimney system. They keep rain, animals, and debris from entering your chimney and causing damage. Installing a chimney cap is a relatively easy process that can be completed in a few hours.
First, you will need to purchase the correct size and type of chimney cap for your specific chimney. Make sure to measure the inside diameter of your flue before purchasing the cap.
Next, use high-temperature silicone caulk to seal any gaps between the cap and the flue.
This will prevent water and animals from entering through those spaces.
Finally, use screws or bolts to secure the Chimney Cap onto the crown of your chimney. Make sure that the screws or bolts are made of stainless steel or another corrosion-resistant material so that they do not rust over time.
- Locate the chimney cap installation kit and gather the necessary tools
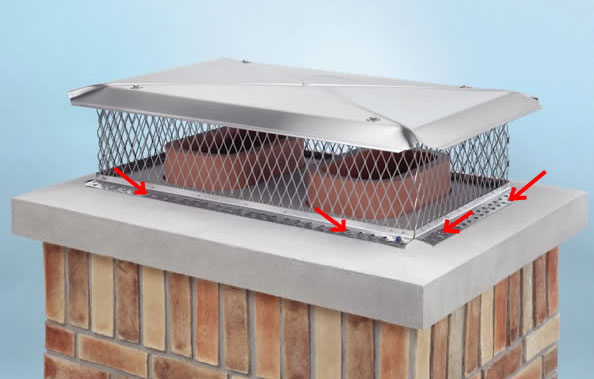
- Place the chimney cap over the top of the chimney, making sure that all four sides are equally flush with the edge of the chimney
- Securely fasten each corner bracket to the corresponding side of the chimney using masonry screws and a drill
- Start at the bottom and work your way up so that each screw is driven into a different course of bricks
- Affix caps to each side of the main body of the chimney cap using sheet metal screws and a drill
- Make sure that these are driven in securely so that they will not back out due to vibration or other movement
- Install any spark arrestor screens included in your kit by attaching them to the underside of the main body of the chimney cap using sheet metal screws and a drill
How To Install a CHIMNEY CAP – Simple and Easy
How to Install a Round Chimney Cap
Chimney caps are an important part of a chimney, as they help to keep out animals and debris. A round chimney cap is easy to install, and only requires a few tools. Follow these steps to install a round chimney cap:
1. Begin by measuring the outside diameter of your chimney. You’ll need this measurement to purchase the correct size chimney cap.
2. Next, use a hammer and chisel to remove any old mortar from around the top of the chimney.
Be sure to wear protective goggles while doing this.
3. Once the area is clean, apply a bead of silicone caulk around the perimeter of the hole. This will help create a seal between the chimney and the new cap.
4. Place the new chimney cap into position, making sure that it’s centered over the hole. Use screws or nails to secure it in place if needed..
If your model has legs, extend them down along the sides of the chimney so that they rest on top of the flue tiles below.. Otherwise, leave them retracted up inside the crown.
. Either way, make sure that all four legs are in contact with something solid so that wind can’t blow your cap off..
Also be sure that any screws or nails you use are long enough to go through both layers of metal but not so long as to come out through bottom layer and poke into your flue liner.. If everything looks good, go ahead and caulk around base where it meets crown or flashing.. Use high temperature silicone caulk for best results.. Let dry thoroughly before using fireplace again.. That’s it! You’ve successfully installed your new round Chimney Cap!
How to Install a Chimney Cap Without a Flue
If you have a fireplace, chances are you also have a chimney. And if you have a chimney, it needs a chimney cap! Chimney caps help to keep out rain, snow, animals, and debris – all of which can clog up your chimney and cause serious damage.
But installing a chimney cap isn’t always easy, especially if you don’t have a flue.
Here’s a step-by-step guide to installing a chimney cap without a flue:
1. Measure the outside dimensions of your chimney.
You’ll need this information to purchase the right size cap.
2. Cut four pieces of wire that are each about 2 feet long.
3. Attach the wires to the corners of the chimney cap using screws or nails.
Make sure they’re secure!
4. Place the chimney cap on top of your Chiminea stack pipe ensuring that it is centered and level. If it isn’t level, adjust the wires until it is before proceeding to the next step.
If your model does not come with pre-drilled holes for attaching wire (Step 5) then follow Step 4A below instead: Center the screen over the opening at least 3 inches in from each side so that when viewed from above there is an overhang on all sides past where attach wire will go around entire circumference . This will give strength to attachment as well as added protection against sparks “shooting” out sideways.
. Drill eight 3/16 inch holes evenly spaced around edge just inside where attach wire will go..
Skip ahead to Step 6) 5) Pull two opposite wires taut and twist them together tightly several times then do likewise with remaining two opposite wires.. Now take one length of heavy duty aluminum foil tape (not duct tape which tends to fall off after getting hot) and starting at bottom middle front wrap entirely around circumference making sure each revolution slightly overlaps previous one until reach starting point again then cut off leaving excess hanging down.. Do same thing going in other direction so now has crisscrossing pattern similar looking like picture below but without actual wood framing shown: [IMAGE] 6) Now take small sheet metal screw with washer attached and insert through aluminum tape into hole drilled earlier making sure goes all way through both layers of aluminum tape..
Diy Chimney Cap
If you are in need of a chimney cap or are looking to upgrade your current one, consider making your own! A DIY chimney cap can be made out of many different materials and customized to fit your specific needs. Here is a step-by-step guide on how to make a basic chimney cap:
1. Gather Materials: You will need some sheet metal, screws, rivets, and sealant. Depending on the size and shape of your chimney, you may also need some wire mesh or hardware cloth.
2. Cut Metal Pieces: Use a template or measure and mark out your dimensions onto the sheet metal.
Cut out the top piece and four side pieces with tin snips or a power shears. If using wire mesh or hardware cloth, cut this to size as well.
3. Assemble Sides: Place the side pieces around the perimeter of the top piece, overlapping at the corners.
Secure in place with screws or rivets. If using wire mesh or hardware cloth, attach this now as well (between the two layers of metal).
4. Seal Edges: Use sealant along all of the seams and joints to create a watertight seal.
Let dry completely before moving on to Step 5.
5. Attach To Chimney: Place the finished DIY chimney cap onto the top of your chimney flue and secure in place with screws or bolts (depending on what is compatible with your set up). That’s it – you’re done!
Chimney Cap Installation near Me
If you’re looking for a reliable chimney cap installation company near you, look no further than our team at ABC Chimney Cap Installation. We have years of experience installing chimney caps of all shapes and sizes, and we’re always happy to help our customers find the perfect fit for their home. Plus, our prices are unbeatable!
Give us a call today to get started.
Credit: www.fireplacemall.com
Can I Cap a Chimney Myself?
If you’re thinking about capping your chimney yourself, here’s what you need to know. Capping a chimney is not a difficult task, but it does require some special tools and materials. You’ll need to purchase or rent a ladder tall enough to reach the top of your chimney, as well as a hammer, screwdriver, trowel, level, tape measure, and mortar mix.
You’ll also need bricks or concrete blocks that are the same size as the ones currently in use on your chimney.
Once you have all of your materials gathered, begin by thoroughly cleaning the area around the base of your chimney. This will help the new mortar to adhere properly.
Next, use the tape measure to find the center point of both sides of the chimney opening. Once you’ve located these points, use the hammer and screwdriver to drive nails into each side at these locations (this will act as an anchor for your new bricks or blocks).
Next, begin mixing up your mortar according to the package directions.
Once it’s mixed properly, start spreading it onto one side of the chimney opening with your trowel. Then place one brick or block onto each nail head (making sure they’re level) and press it firmly into place. Continue this process until both sides of the opening are capped off with bricks or blocks.
How Do Chimney Caps Attach?
Chimney caps are typically attached to the top of the chimney using screws or bolts. In some cases, they may be held in place with mortar. The type of attachment will depend on the material of the chimney and the type of cap.
How Do You Cap the Top of a Chimney?
It’s important to cap the top of your chimney to keep water and animals out. There are many different ways to do this, but one of the most common is to use a metal chimney cap. You can buy these at most hardware stores.
To install it, first make sure that the top of your chimney is clean and dry. Then, put the cap over the opening and screw it into place.
How Much Does It Cost to Put a Chimney Cap On?
If you have a chimney, it’s important to cap it off with a chimney cap. A chimney cap helps prevent animals and debris from getting into your chimney, and also keeps water from seeping in and causing damage. Chimney caps typically cost between $100 and $300 to install.
Conclusion
Chimney caps are an important part of any fireplace, and they should be installed correctly in order to work properly. There are a few steps that need to be followed in order to install a chimney cap correctly. First, the cap must be placed on the top of the chimney so that it is level with the top of the flue.
Next, screws or nails should be used to secure the cap to the chimney. Finally, the cap should be checked periodically to make sure that it is still securely in place and that there are no gaps around it.